You’ve finally found the perfect house, or perhaps you’re planning a major upgrade to your current one. There’s just one snag: the driveway access is non-existent, crumbling, or just plain unsafe. That crucial link between the public road and your private property isn’t something you can afford to get wrong. It’s more than just a patch of concrete; it’s a legal interface, a safety feature, and a major curb appeal element all rolled into one. Getting your vehicle crossing right is fundamental.
This guide will walk you through everything you need to know, from untangling local council regulations to choosing materials that will last decades. Think of this as your essential handbook for navigating the sometimes-complex world of creating a safe, legal, and aesthetically pleasing point of access for your car.
Table of Contents
- What Exactly is a Vehicle Crossing?
- The 15-Point Master Checklist for Your Project
- Navigating the Legal Landscape: Permits and Regulations
- Design and Material Choices: Beyond Basic Concrete
- The Installation Process: What to Expect
- Cost Considerations and Budgeting Realistically
- Maintenance and Long-Term Care
- Final Thoughts: Your Pathway to Better Access
1. What Exactly is a Vehicle Crossing?
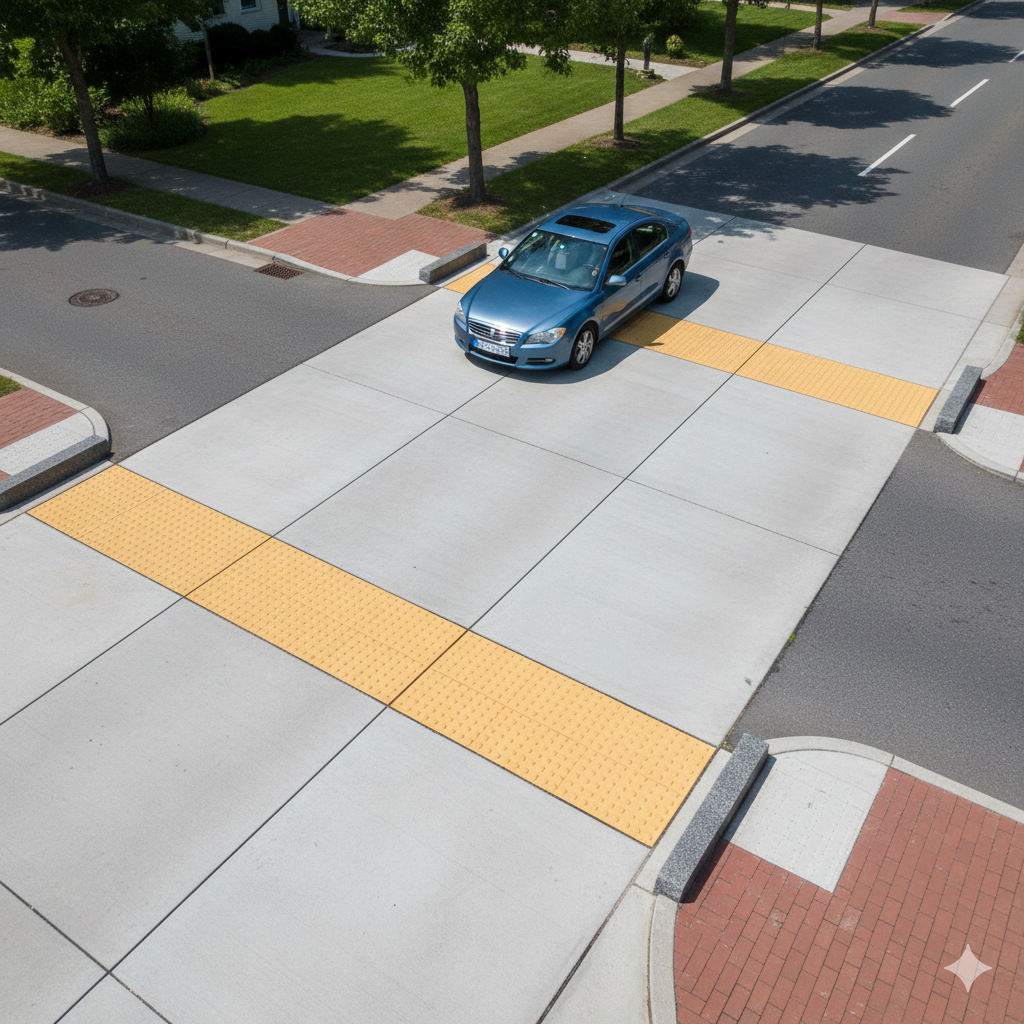
Let’s start with the basics. A vehicle crossing—often called a crossover, driveway apron, or simply a dropped kerb—is the specifically constructed section that allows you to drive from the public roadway over the pavement (sidewalk) and onto your property. It replaces the standard-height kerb with a lowered, reinforced section designed to handle the weight and frequent use of cars, vans, and sometimes larger vehicles.
A properly built vehicle crossing does several critical jobs. First, it protects public infrastructure. The pavement and underground utilities aren’t designed to bear the load of a two-ton car. A dedicated vehicle crossing reinforces this area. Second, it ensures pedestrian safety by maintaining a clear, defined sidewalk path. Third, it prevents damage to your vehicle’s suspension. Hitting a standard kerb daily is a recipe for expensive repairs. Every time you smoothly transition from street to driveway, you’re benefiting from a well-constructed vehicle crossing.
2. The 15-Point Master Checklist for Your Project
Before you pick up a phone or buy a single bag of cement, work through this list. It covers the key phases of any successful vehicle crossing project.
Phase 1: Research & Planning (Points 1-5)
- Council First, Always: Your local authority controls the public highway. You must identify their specific rules for a vehicle crossing. This is non-negotiable.
- Check for Hidden Obstacles: Call utility companies for a clearance check. Gas, water, fibre optic cables—you need to know what’s buried beneath your proposed site.
- Measure Twice, Dig Once: Determine the optimal width. A single car vehicle crossing typically needs 2.4 to 3 metres. For double driveways or larger vehicles, 4.5 metres or more may be required.
- Sight Line Safety: Ensure your new access point doesn’t create a blind spot for you or other road users. Councils have strict visibility splays.
- Choose Your Professional: Decide if you’ll use a council-approved contractor or source your own. Using an approved list often streamlines the inspection process.
Phase 2: Design & Approval (Points 6-10)
6. Material Selection: Concrete is standard, but consider block paving, tarmac, or reinforced gravel grids for aesthetics and drainage.
7. Drainage Integration: How will water run off? The vehicle crossing must not create puddles on the footpath or channel water toward your property.
8. Tactile Paving Compliance: Most regulations require visually-impaired pedestrian warning strips (tactile paving) on both sides of the vehicle crossing. Factor this into the design.
9. Submit Formal Applications: Complete all council forms, often requiring site plans and payment of an application fee. Never start work without written approval.
10. Finalise Quotes & Schedule: Get detailed, written quotes from contractors that include materials, labour, reinstatement of public land, and all permit fees.
Phase 3: Execution & Finalisation (Points 11-15)
11. Pre-Start Meeting: Confirm timelines, access, and material delivery with your contractor on-site before work begins.
12. Supervise Key Stages: Be present for the kerb lowering, base compaction, and final surfacing. A good base is critical for a long-lasting vehicle crossing.
13. Council Inspection: The authority will likely inspect the sub-base and the finished work to ensure compliance. Your contractor should manage this.
14. Landscaping Integration: Plan how the edges of the vehicle crossing will meet your garden or driveway. Soften with planting or defined edging.
15. Documentation: File your council approval certificate and contractor warranties safely. This is vital for future property sales.
3. Navigating the Legal Landscape: Permits and Regulations
This is where many DIY dreams meet reality. You do not own the public footpath or the road. Therefore, altering it—even to create access to your land—requires permission. The process for obtaining a vehicle crossing permit varies by council, but the core principles are universal.
Typically, you’ll need to prove your proposed access is safe and won’t disrupt public infrastructure. Councils will reject applications if the site is near a street corner, bus stop, or tree protected by a preservation order. They are also responsible for ensuring the structural integrity of the vehicle crossing base, as a failure could damage pipes and cables below. Ignoring these regulations and building an unauthorized vehicle crossing can result in hefty fines and a mandatory—and costly—restoration order to put everything back as it was. It’s simply not worth the risk.
4. Design and Material Choices: Beyond Basic Concrete
Your choice of material affects the look, longevity, cost, and even the permeability of your vehicle crossing.
- Standard Concrete: The most common and cost-effective choice. Modern brushed or exposed aggregate finishes offer better traction than slick finishes. A well-laid concrete vehicle crossing can last 30+ years.
- Reinforced Block Paving: Offers a premium, traditional look that can complement your home’s brickwork. Excellent flexibility (individual blocks can be replaced) and good drainage if laid on a suitable base. Ideal for creating a seamless visual flow from a block-paved driveway.
- Tarmac/Asphalt: A faster, often cheaper installation that provides a seamless black finish. It’s flexible, which can be good for less stable ground, but may require more maintenance and sealcoating over time.
- Eco-Options: For those concerned with rainwater runoff, permeable paving solutions like reinforced grass or gravel grids allow water to drain through the vehicle crossing surface itself, reducing localised flooding.
Remember, the material you choose for the visible surface must be supported by a properly engineered base. Regardless of whether you choose elegant blockwork or simple concrete, a deep, compacted sub-base of MOT Type 1 gravel is the unsung hero that prevents your vehicle crossing from sinking or cracking.
5. The Installation Process: What to Expect
A professional installation of a new vehicle crossing usually follows a clear sequence over several days.
- Setting Out & Demolition: The area is marked, and the existing pavement and kerb are carefully broken out.
- Excavation & Sub-Base: The ground is excavated to a specified depth (often 300mm+). The MOT Type 1 stone is then laid in layers and mechanically compacted to create a rock-solid foundation. This is the most critical stage for the lifespan of your vehicle crossing.
- Kerbing & Drainage: New, pre-cast concrete kerb units are set at the dropped height. Any necessary drainage channels or gullies are installed at this point.
- Surfacing: The chosen final material (concrete, blocks, tarmac) is applied and finished.
- Tactile Paving & Reinstatement: The required tactile warning strips are installed flush with the pavement on both sides. The public footpath area is neatly reinstated to match the surroundings.
A well-executed project will leave a clean, level, and robust vehicle crossing that looks like it has always been there.
6. Cost Considerations and Budgeting Realistically
Costs vary wildly based on location, size, materials, and ground conditions. As a rough 2023 guide in the UK:
- Standard Concrete Vehicle Crossing (Single): £1,000 – £2,500
- Block Paved Vehicle Crossing (Single): £1,800 – £3,500+
- Council Application/Inspection Fees: £150 – £500
Always budget for the unexpected. You might discover poor ground conditions that require extra excavation and base material. The quote should clearly separate labour, materials, and council fees. View this not just as a cost, but as a long-term investment that protects your vehicle, enhances your property’s value and functionality, and ensures legal compliance for your essential vehicle crossing.
7. Maintenance and Long-Term Care
A vehicle crossing is built for durability, but it’s not maintenance-free. Here’s how to keep it in top shape:
- Clean Regularly: Sweep away debris and wash off oil spills promptly, especially on porous materials like block paving.
- Weed Control: Keep joints between blocks or cracks free from weeds, which can displace material and trap moisture.
- Avoid De-Icing Salts: These can spall and damage concrete surfaces. Use a less corrosive alternative like sand for grit.
- Watch for Settlement: If you notice a dip or ponding water on the vehicle crossing surface, address it early. Small cracks can be filled; significant settlement may require professional assessment to see if the sub-base has failed.
Proactive care will extend the life of your vehicle crossing for decades, ensuring it remains a safe and reliable point of access.
8. Final Thoughts: Your Pathway to Better Access
Installing or renovating a vehicle crossing is a significant project that sits at the intersection of home improvement and civic responsibility. It requires careful planning, respect for regulations, and quality workmanship. By following a structured approach—securing permissions, investing in a proper base, choosing suitable materials, and hiring reputable professionals—you transform a potential headache into a valuable asset.
A well-executed vehicle crossing provides daily convenience, peace of mind, and a polished first impression. It’s the fundamental link that makes your driveway truly usable, marrying your private haven with the public realm in a safe, legal, and durable way. Take the time to plan yours correctly, and you’ll reap the benefits every single time you come home.